Author: expert Ella Pill
Instagram: @ella_permanentmakeup
21 years in the beauty industry. An expert in permanent makeup for Eyebrows, Lips, and Eyeliner.
Choosing PMU colors is one of the most intimidating parts of permanent makeup for beginners. New artists often worry about picking a shade that looks perfect in the cup but heals too cool, too warm, too dark, or simply wrong for the client.
The truth is that successful pigment selection is not based on one factor. It comes from reading the skin correctly, understanding how color behaves after healing, and making decisions that fit the client’s features, preferences, and long-term goals. Industry education consistently emphasizes that healed color is shaped by skin tone, undertone, pigment temperature, Fitzpatrick type, and correction strategy – rather than the bottle color alone.
Before choosing any PMU color, begin with a thorough client consultation. Several factors regarding client preference and lifestyle should guide saturation, depth, and warmth from the very beginning.
Key questions to ask your client:
Looking at inspiration photos, seeing the client with their usual makeup, and discussing maintenance expectations all make pigment selection more accurate.
A beginner should also document the starting point carefully. Examine the skin in natural light, photograph the area from multiple angles, and note factors such as:
Good consultation habits reduce guesswork and produce much more predictable healed results.
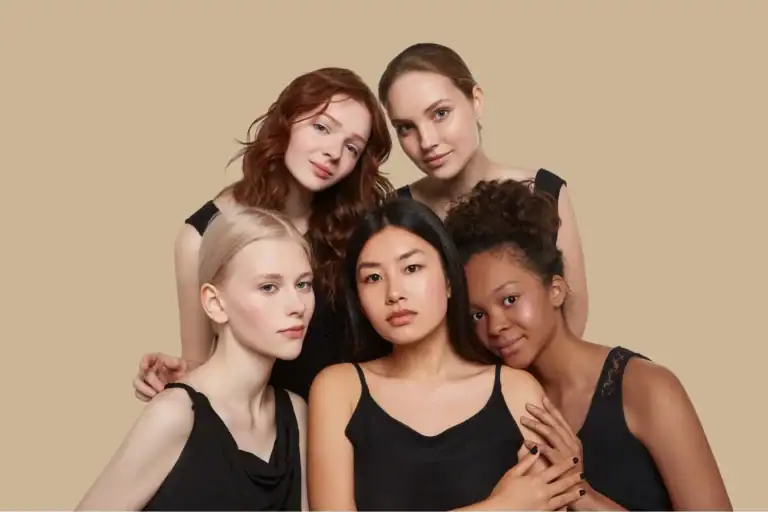
One of the biggest beginner mistakes is focusing only on surface skin color. In PMU, you need to evaluate both overtone and undertone.
Overtone (Surface Tone): Tells you whether the client appears fair, medium, tan, brown, or deep. This depth is often considered alongside the Fitzpatrick scale.
Undertone: Tells you what subtle color influence is sitting beneath the surface. Undertones are generally grouped as warm, cool, or neutral.
A warm undertone may read golden, peachy, or yellow. A cool undertone may read pink, red, bluish, or (in PMU healing) sometimes olive-leaning. Neutral undertones sit somewhere in between.
Check the overall cast of the skin and compare how silver versus gold looks on the client. Use wrist veins only as a secondary clue rather than the only test (blue or purple veins generally indicate a cool undertone, while green veins indicate warm). Real pigment selection must consider the whole face and healing behavior, not a single shortcut.
Freshly implanted pigment is not the final result. As pigment settles and the skin heals, the result tends to look softer, duller, and often cooler or ashier than it does on procedure day.
There is a natural “cooling effect” during healing, and experienced artists often compensate by choosing warmer support in the formula when appropriate. This is exactly why professionals do not chase the exact final healed look during the appointment by simply matching what looks right in the cup.
This healing shift is why overly cool choices can become flat, gray, or blue-based once healed, especially on skin that already cools the result. On the other hand, using too much warmth on a client who already pulls warm can leave the healed result looking orange or overly red. The best PMU color is rarely the most obvious-looking one at first glance—it is the one that takes healed behavior into account.
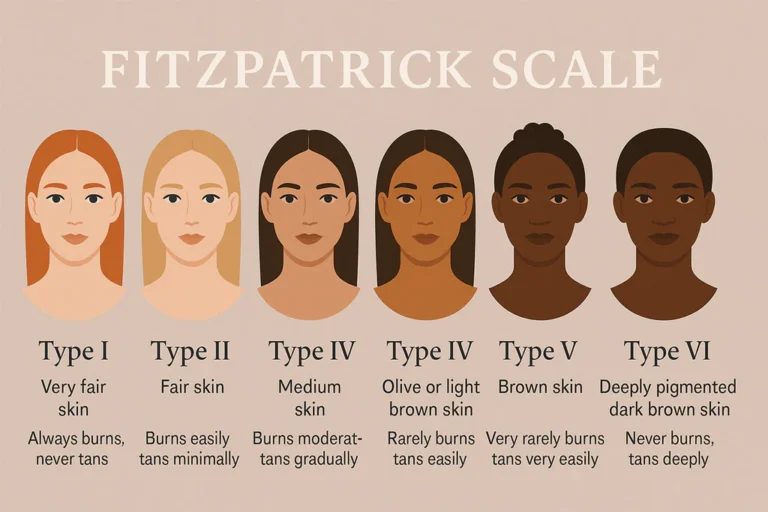
The Fitzpatrick scale remains one of the most common frameworks for predicting how pigment may behave in the skin.
Fitzpatrick I–II (Lighter skin): More translucent skin types tend to reveal pigment undertones more clearly.
Fitzpatrick III–IV (Medium skin): These skin types may be somewhat more forgiving.
Fitzpatrick V–VI (Deeper skin): Deeper skin tones often need richer, more intentional warmth and contrast to avoid a dull or ashy healed appearance.
That said, Fitzpatrick should never replace undertone assessment. Two clients with the same Fitzpatrick type can heal very differently if one is cool and the other is warm, or if one has previous work, high vascularity, sun damage, or strong oil production. Treat the Fitzpatrick scale as a reference point for behavior, not as an automatic recipe generator.
For beginners, a practical way to simplify PMU color selection is to make two decisions first: depth and temperature. This is incredibly useful logic because it forces you to think in healed outcome terms instead of getting overwhelmed by dozens of bottle names.
Depth: Answers how light, medium, or dark the healed result should appear.
Temperature: Answers whether the formula needs more warmth, a balanced neutral feel, or less warmth.
Expert Note on Hair Color: Do not choose color by hair alone! Hair color can help with depth, but it should not control the entire formula. Brows are often chosen one to two shades lighter than the hair. Cool hair color does not automatically mean ash pigment, and gray hair does not mean gray brows. Two brunettes may need completely different pigment strategies depending on whether their skin heals warm or cool.
PMU color selection should strictly reflect the procedure. Brows, lips, and eyeliner are not chosen the same way.
Beginners should focus on natural harmony over dramatic intensity. Fair clients usually need softer values and more restraint. Medium complexions usually allow more flexibility. Deeper skin tones often require enough richness and warmth to prevent the healed result from disappearing or turning muddy. (The Safe Principle: When in doubt, go lighter and build at the touch-up. For a client who heals cool or olive, additional warmth may be necessary. Neutral clients usually tolerate balanced formulas best. Choose warmth intentionally – it is not a flaw in PMU; it is insurance against a poor healed outcome.)
Lips involve another level of complexity because natural lip tissue, vascularity, melanin, and previous discoloration can alter the final appearance dramatically. If the lip base is dark, cool, or uneven, neutralization must come before the beauty shade.
Eyeliner offers more freedom in intensity while still requiring undertone awareness. Softer blacks or brown-black tones may suit fair or warm clients better for an everyday look, while deeper skin can support stronger saturation.
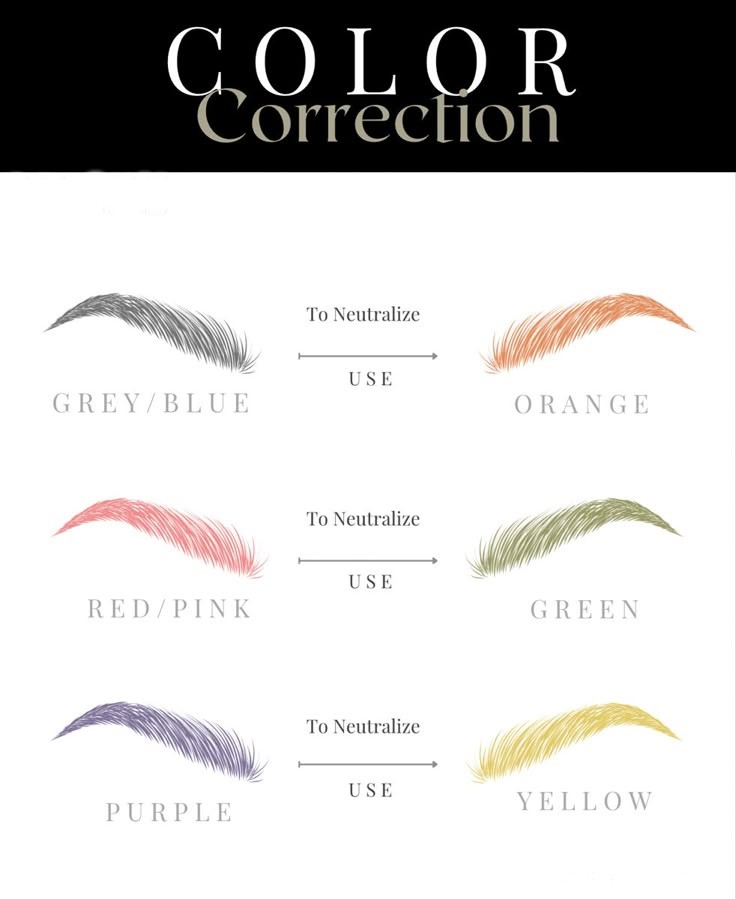
A beginner’s guide would be incomplete without color correction. PMU color choice is not only about enhancement; sometimes it is about neutralization. Correctors are vital for fixing unwanted healed tones:
When the canvas is not neutral (especially in lip work or old PMU correction), your first job is correction, not beautification. You must neutralize dark or uneven pigmentation before implanting the target shade.
Beginners often confuse mixing and layering:
Mixing: Adjusting the formula before implantation to create the right balance of depth and temperature.
Layering: Building color gradually over time or through multiple passes and touch-up sessions.
For new artists, restraint wins. Start with a lighter pigment and add darkness cautiously. Use small formula adjustments, document them, and avoid overcorrecting in a single session. PMU is not a race to the darkest or strongest result on day one.
| The Mistake | The Consequence | The Solution |
| Judging by the Bottle | Choosing what looks pretty in the cup leads to unpredictable, often ashy results. | Always account for the healing shift and undertone. |
| Ignoring Undertone | Assuming surface shade tells the whole story results in poor color matches. | Evaluate both overtone (depth) and undertone (temperature). |
| Going Too Dark Too Early | Dark pigment is incredibly difficult to remove or reverse. | Stay conservative. It is easier to add depth at the touch-up session. |
| Matching Hair Exactly | Cool hair on a cool-healing client can result in flat, gray brows. | Treat the skin and the hair as two different variables. |
| Poor Note-Taking | Forcing yourself to “start from zero” at every touch-up appointment. | Document skin behavior, formula, needle configuration, and healed photos. |
Assess the client in natural light: Look at overtone, undertone, contrast level, and any pre-existing pigmentation issues. Avoid distorted studio lighting.
Define the target result: Decide whether the client wants soft, balanced, or defined PMU. This determines depth and saturation.
Use Fitzpatrick as a behavior guide: Estimate how transparent or melanin-rich the skin is likely to be.
Choose temperature intentionally: Ask whether the result needs extra warmth, balanced neutrality, or less warmth.
Stay conservative with depth: Lighter is safer. You can always deepen at touch-up.
Correct first if needed: If there is previous PMU or strong discoloration, neutralize before applying the target shade.
Record everything: Track the formula, modifiers, passes, skin response, and healed photos. Predictability comes from repetition plus documentation.
New artists often believe advanced color work is about memorizing hundreds of pigment recipes. In reality, great PMU color selection begins with a simpler mindset: read the skin carefully, understand the likely healing direction, and make small, informed decisions.
Good PMU color is not just chosen; it is predicted. For a beginner, confidence does not come from guessing boldly. It comes from choosing thoughtfully, staying conservative when uncertain, and learning from every healed result.
Welcome to All Esthetics
10 Verbena Ave, Floral Park, NY 11001.
Sign up for Microshading, Microblading, Permanent Makeup Lips…